Pages

Showing posts with label Sally Hansen Xtreme. Show all posts

Tuesday, August 3, 2010

Random Bits

Berlioz says hi!


First, here is the current mani I'm sporting. I actually got several comments on them today so I'm pretty pleased.

I used Sally Hansen Xtreme Blue Me Away as my base color with a faux-nad plate (courtesy of ebay) and Orly White Tips for the French and Stripe Rite for the yellow stripe.

Then, here is the pedi I'm sporting, I know it looks like I've got a bad shadow, but I actually did a vertical gradient on the big toes.
I used Savvy 'Totally Teal' and LA Girls Disco Brites 'Hustle' as well as a cute little aqua stars that arrived from Dollar Nail Art last night.
Kinda funny, I discovered a con to having a nice pedicure. My naughty puppies decided to dig under the fence and explore the neighborhood, a neighbor brought one of them home but that left one on the run so without even thinking I went out in search. I didn't think about the effect of heat on asphalt/concrete until it was too late, No calluses on your feet means burned feet. I actually have blisters. But what's really important is that the toes look fabulous as I hobble along.

Speaking of Dollar Nail Art, these were also in the package and are making it very difficult for me to keep my polka dot french on. I am dying to try some foils!
I'm going to try and be strong though. I have military duty for the weekend and all of next week so I'm going to keep the current mani until I have to go with the boring.
I dunno though, maybe I can get away with a neutral with the opal swirl over the top.

And finally, I went to Ulta to get the Goth Glam polish set but they were all out. The lady sounded like my daughter as she tried to get me to buy some of the other dark singles instead. "They're the same but different." Ok so I did buy some singles but really, if I'm there to buy something in particular don't give me the but this is practically the same schpiel.
I was actually pretty pleased to buy Ulta products because if you spent $17 and change you got a free makup bag that was an $88 dollar value. Look at all the goodies that were inside!
My thoughts on this deal. "SCORE!!" I don't know how long this is running but it's in my opinion it's well worth the $18 .
Here is a shot from the website, it's the cool colors, I got the warm in the green bag.
Friday, July 30, 2010

Fun Edges Tutorial

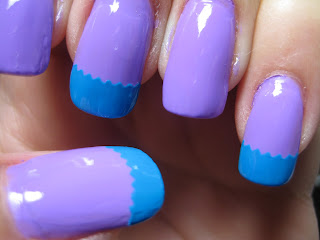
So here's a fun addition that I made to my News of the Beloved Mani. I got the bright idea that you could use decorative scissors to create something similar to the french tip guides. I remember seeing someone using a similar idea with painters tape (sorry, can't remember where) but figured I'd share my version.

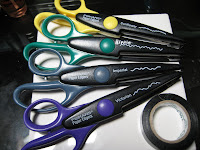
Lets pull together our supplies.
First you'll need some cool craft scissors. Being a bit of a jack of all crafts I have a multitude of decorative edge scissors as you can see. These are just some of the ones that have potential for my purpose.
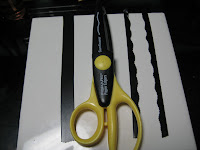
I use electrical tape because it seems to be pretty close to the material they use for the nail guides. It has great adhesion and won't tear. The narrowness of the tape makes it a bit more difficult to work with so find the widest you can.

Here you can see I've taken a length of electrical tape and cut it down the center. You then have for lack of a better term a negative and a positive pattern. From here you can cut them into shorter lengths for your individual nails.


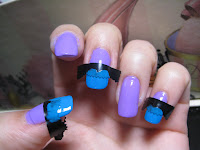
Then, just like with the nail guides, place them on your nail (which should already have a nice dry base color) and with the polish of your choice (I used Sally Hansen Xtreme 'Blue Me Away') paint from the guide out (notice how my brush strokes start in the middle of the guide) filling in any missed spots as needed. Be careful to not to use too much polish, if you do it makes it harder to achieve a nice detail. If you do accidentally use too much polish, take a cotton swap dipped in polish remover and clean as close to the edge of the guide as possible, this cuts the goopyness and hopefully allows for better detail.
Wait until the polish is almost but not quite dry and pull the guide TOWARDS you slowly. To clarify, on my nails I pulled it back towards my arm not toward the tips of my nails even though they were pointed towards me for this picture. Make sense??
From there, it's just a matter of applying your top coat and enjoying your new look.

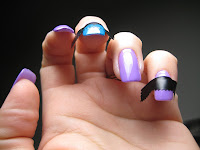
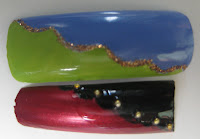
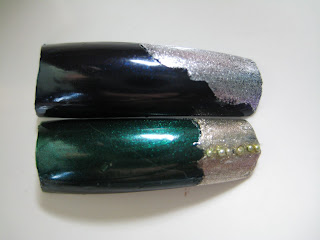
Here are some pictures of other edges I've used (pardon the glitches...the things you don't notice until you take a closeup.). Play around with it and have fun. I hope you enjoyed this little tutorial. If you try it out I'd love to see it!

Wednesday, July 14, 2010

Ho Hum nails

I get to do a few days here and there in uniform for the Air Force. Last week it was Thursday thru Sunday and this week it's Thursday and Friday.
Thing is, in uniform they're very specific on what you can or rather can't do with your nails. (The can't do list is much longer than the can do.)
While I was on active duty for three years I either had an acrylic french or my natural nails unpainted but rebelled in my own way by having bright toes. Now that I've been off orders for a long while I've gotten used to having my flashy fingers.
Last week I had the most muted, pale pink nails I've had in a long while and they nearly put me to sleep every time I looked at them.
I've been looking at my collection of polishes, the blues and purples, the deep, bold reds, the vibrant greens and cheery yellows and oranges and wondering what to do. Do I add some flash to a basic pink and hope I can get away with it or do I just suck it up and keep it boring. It's only two days.
In other news, our Walgreens is having a sale on Sally's Xtreme wear, two for $4. The daughter and I picked up some fun colors. I think they'll be way fun for water marbling.