Pages

Friday, July 30, 2010

Fun Edges Tutorial

So here's a fun addition that I made to my News of the Beloved Mani. I got the bright idea that you could use decorative scissors to create something similar to the french tip guides. I remember seeing someone using a similar idea with painters tape (sorry, can't remember where) but figured I'd share my version.

Lets pull together our supplies.
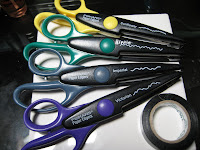
First you'll need some cool craft scissors. Being a bit of a jack of all crafts I have a multitude of decorative edge scissors as you can see. These are just some of the ones that have potential for my purpose.
I use electrical tape because it seems to be pretty close to the material they use for the nail guides. It has great adhesion and won't tear. The narrowness of the tape makes it a bit more difficult to work with so find the widest you can.
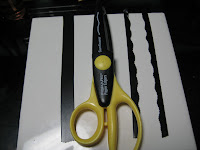
Here you can see I've taken a length of electrical tape and cut it down the center. You then have for lack of a better term a negative and a positive pattern. From here you can cut them into shorter lengths for your individual nails.
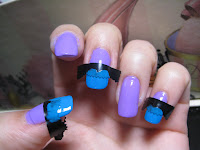
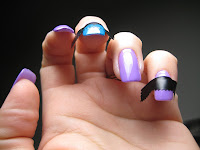

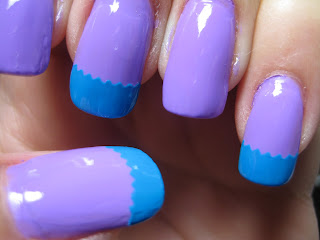
Then, just like with the nail guides, place them on your nail (which should already have a nice dry base color) and with the polish of your choice (I used Sally Hansen Xtreme 'Blue Me Away') paint from the guide out (notice how my brush strokes start in the middle of the guide) filling in any missed spots as needed. Be careful to not to use too much polish, if you do it makes it harder to achieve a nice detail. If you do accidentally use too much polish, take a cotton swap dipped in polish remover and clean as close to the edge of the guide as possible, this cuts the goopyness and hopefully allows for better detail.
Wait until the polish is almost but not quite dry and pull the guide TOWARDS you slowly. To clarify, on my nails I pulled it back towards my arm not toward the tips of my nails even though they were pointed towards me for this picture. Make sense??
From there, it's just a matter of applying your top coat and enjoying your new look.

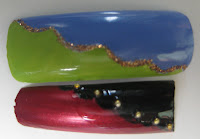
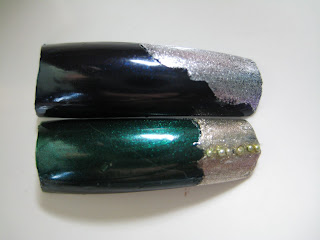
Here are some pictures of other edges I've used (pardon the glitches...the things you don't notice until you take a closeup.). Play around with it and have fun. I hope you enjoyed this little tutorial. If you try it out I'd love to see it!
Thursday, July 29, 2010

QRS News of the Beloved


This is QRS's News of the Beloved.
I'm trying to figure out how the name ties in with the color which is a lovely bright lavender. My camera makes it seem a bit more blue than it is, but I don't know enough about it to fix that so you'll just have to trust me.
Coverage is ok in two coats but I'd recommend a third because the application is a little streaky. Also, it's a semi-matte that dries really fast so visible brush strokes are an issue. For the most part though a clear top coat will fix both of those issues.

I'm not a huge fan of the pastel-y colors but I am kinda in love with this one, it's super flattering to my skin tone and makes my barely there tan look like I live in California rather than vacationed there. I love finding colors that really work for me and my top two are this color and OPI's I'm Not Really A Waitress.

Do you have polishes that just work for you and enhance your skin tone?

Wednesday, July 28, 2010

Accent colors

Polish Hoarder always has these wonderful challenges where she supplies the theme and you supply the creativity. I love seeing what people come up. Last week she had a Color Accent challenge where you could only use black, white and grays and one pop of color. I couldn't participate since we were getting ready to go and actually on vacation, but it interested me enough that I really wanted to give it a whirl.
If you want to see a video tutorial for plaid nails, I pretty much stole this from Nails by Asami. I just thought the look would be perfect.


Now that I've done plaid nails I can say that I like them. How about you, have you tried them?

Whoops, forgot to mention what color I used (thanks peripatetic33). American Apparel Factory Grey is my base, the white and black stripes are Stripe Rite and I actually started using the bright green Stripe Rite for the green but it didn't pop enough so I went over it with Finger Paints Guggen I'm Lime (love that name).

Tuesday, July 27, 2010

American Apparel 'Factory Grey'

Here is one of the polishes that I picked up while on vacation in California and probably my favorite.
American Apparel Nail Lacquer in Factory Grey is a wonderful gray creme with maaaybe just the barest hint of pink.
The consistency is perfect, not too thick, not too thin so application is a dream. You get perfect coverage in two easy coats and it dries with an almost vinyl shine. Gorgeous! It's a perfect gray for wearing alone or (teaser) using as a base for some pretty nail art. It really allows an accent color to pop.
My only complaint is the bottle, since it's so narrow I was in constant fear that I'd tip it over.


Yesterday as I was swatching all my polish on nail wheels I discovered that I am sadly lacking in gray polish. I only have two that could be considered true grays. I actually find that kind of sad and have every intention of rectifying the situation.
How about you, where do you stand with gray polish?

Monday, July 26, 2010

She's back!

We've returned from California, pulling into the driveway at about five o'clock Monday morning. I promptly fell into bed for the next six hours (nothing makes you appreciate your own bed more than not sleeping in it for a few nights).
I was hoping to get a bunch of swatching done in the afternoon, but while I was getting the first color on the sun disappeared behind a thick layer of clouds and refused to make another appearance for the day.
I did get pictures of the polish I picked up in California. I was rather surprised to find these actually, the Boardwalk of Venice Beach doesn't really sound like someplace where you can get nail polish, but you can and I'm glad.

American Apparel Nail Lacquer in Manila, Factory Grey and Pinto. Then Manic Panic in After Midnight and Unicorn.

I will get to Show n' Tell just as soon as the sun comes out.

Friday, July 23, 2010

Quirius

Greetings from California!! After a 15 hour drive we arrived to gray skies. I thought it was smog but I'm happy to report it's just a cloud cover that rolls in off the ocean during the night. It usually burns off by about 1:00. And yes, I am sunburned. Other than that, It's beautiful. We're staying about three blocks away from Venice Beach. Today we did nothing more than shop on the Boardwalk.
I've been on the lookout for new polishes and I've found some from Manic Panic and American Apparel. I'll show them off once I'm home since I didn't bring the stuff to do a polish change here. (My Artistic Azure is a bit dull with a tiny bit of tip wear, but still going strong!)
Anywho, on with the main topic of this post which I wrote up before I left home...

LunatiKitty has recently had several posts involving Quirus nail polishes.
Since I'm pretty new to this nail stuff I wasn't surprised when I hadn't ever heard of them, so I went polish hunting and discovered Q.R.S. Beauty.
Honestly, I was expecting high priced polish, imagine my surprise and delight to see that they were amazingly affordable. $3. for a single .5 Fl Oz. bottle and $15 for a set of 6. Shipping was exceptionally reasonable and gloriously quick as well.
I'll give a full mani run down of each color in later entries but as of this moment I've single nail tested a few of the colors and find the formula smooth and easy to work with. The finishes vary from gloss to a semi matte that is just fun (they don't really tell you though so it's a toss up) and for the most part, coverage is excellent in two coats.
All in all I've been absolutely delighted with my order and have every intention of purchasing from them again...soon. :)


Here is what I got:
Photo on the right, Quirius Set 03 Blossom which includes (from left to right) Nubba Dubba, Ok is Me, Chastity, Violet Pink, Royal Love, Lavender Bouquet.

Photo on the left, Caribbean Turquoise (this is one yummy blue), News of the Beloved (My free gift), Royal Glitter, Russian Red, Decades of Shades and Red Square (this color is a wonderful surprise, more on it later).


Please keep in mind that I purchased these polishes, I was not given them nor paid to endorse them (I wish). So this is my honest, unpaid opinion of the company and these polishes. I'm sure that should you choose to visit their store you will encounter the same experience

Wednesday, July 21, 2010

The Cali Mani

So, I can't tell you how much I agonized over this mani. Not because it's all that, but because it's for my trip to L.A. and has to be simple yet awesome and last until Sunday.
Well I think I managed the simple yet awesome part, but we'll have to wait and see on the lasting until Sunday part. My last few mani's I've tried Orly Bonder for my base coat with fairly good success. I say fairly good because I am beyond wicked to my nails. Cruel and unusual treatment comes to mind and that is why all of them now have a nice thick layer of acrylic over them. If I didn't I would have nothing but sad little nubbs...but back to 'Bonder'.
As said it seems to really be helping the staying power of my polish, I just don't have a long enough attention span to let a polish go long enough to see how far it will take me. At the moment I think four days is my record and I came out with barely there tip wear and part of that was because I did a pedi and held the cotton ball with my finger tips... Someday I'll learn right?

So back on track, this polish is Finger Paints Artistic Azure which I'm sure you can see is a gorgeous blue. It reminds me of the ocean and the sky so I figured it would be perfect for Cali.
The first coat went on a little streaky but the second coat fixed that and because I can't leave well enough alone, a third coat went on topped by Sally Hansen's quick dry (in the red bottle which isn't in front of me at the moment to see what it's actual name is).
It was lovely but I wanted to bump it up just a wee bit more, so I took Stripe Rite's blue glitter and added the diagonal streak. I need to put the top coat over that (these pictures are sans top coat over glitter) to beef up the shine a bit but other than that I'm really please with how this mani turned out.
What do you think, is it suitable for Cali?

.

Tuesday, July 20, 2010

A Bit of Bling

The fam and I are leaving for LA Wednesday night!! Four days for the beach and window shopping. Of course Katy Perry's California Girls keeps running through my head but I'll leave the Daisy Duke's, bikini on top to the daughter.
We finally found and bought her a swimsuit for the trip. After we got home she showed me how it looked. They eyebrow went up and the mom voice came out with "That's an awful lot of skin". The daughter's response was "It's cute with room to worry". *Sigh*
We actually ran several errands and the last two of the day were Ulta and Nordstrom's Rack. I was wanting to spice things
up with my make-up while we're gone and these caught my eye.

The two Savina polishes I got at the Rack, the other items were purchased at Ulta. Not a single item was over $6! Do I know how to shop or what?!
Being the absolute girl that I am, I barely made it home before testing out the glitter. Oh la la! (That's actually what is on the lid of the glitter creme) It's not what I consider a creme but that is some potent glitter! Since it was on end of the day face you'll have to take my word for it at the moment because I wasn't about to take pictures. I have to say the glitter liner is my favorite. It has an "Oh look, sparkly" effect without being overpowering. I love me some bling, but I'm not usually all that into my make-up screaming "HERE I AM, LOOKEE ME!!" Yeah yeah, I know, this coming from the girl that bought a glitter pallet.

Now here's where I get a little naughty. I stayed up way to late and by the time I actually went to bed...washing my face was the furthest thing from my mind. I know, I know, sinner! dodges the thrown items But truth be told, I woke up this morning looking fabulous! The glitter liner had set my regular liner like nothing else and it hadn't budged an inch and the glitter (gold at the inner corners of my eyes) was pretty well in place too. So much in fact that even post face washing it had done little more than move about the rest of my face and I looked like I should have been wearing feathers and sequins in Vegas (but that's another Katy Perry song altogether). I had to use olive oil and cotton squares to get it off. Tooo fun though, I'm excited to keep playing with it while we're in Cali. Wish me safe travels and a safer return. Ciao!


The money...er, glitter shot. Yeah! BLING BABY!!

Monday, July 19, 2010

Green!

I love green. I mean I really love green. Green is one of my happy colors that just makes me all jolly inside when I see it. Green is versatile, it can be bright and cheerful or deep and exotic and lets face it, green is sexy.

So as mentioned in a previous blog, I had to spend some time in uniform. My fingernails were a subtle fail but weren't the artistic venture that I've become acustomed too. So I had to make do with kicking the toe nails up a notch.
Can you guess what color I used??...

Oh come on, guess...

Yup, you guessed it. Green!


I used the sponge method with one shade of yellow and four shades of green as well as a green goblin-y glitter that I adore.
I love the way they turned out and have been wearing my green skirts since Saturday so my skirts and toes match. Unfortunately I haven't gone any place where they can be noticed. Maybe the library tomorrow.
I know you probably already know all about the sponge technique, but just because I love this color combination so much I think I'm going to work up a tutorial on it.
Something to look forward to perhaps?? I think so.

This polish made possible by...

Thanks to Scrangie and her "Quite possibly the most important post ever" I see the brilliance in holding onto your older polishes. You can restore them!!
It's been a few years but I am once again admiring the multi faceted color of OPI's Amethyst Abyss on my nails.
I'm new enough to the technical side of nails to be sure, but I believe this is a duo-chrome. Meaning, (correct me if I'm wrong here) that there is more than one hue or color that shows up. In this case, there are beautiful shades of purple (of course), pink, gold and green. It's really amazing and had my boyfriend quite perplexed for several moments as he held my hand and moved it every which way as he contemplated the color shift.
This was my first ever salon quality nail polish purchase. I think I got it some time in 2000. There was a salon supply shop next to my work (the kind where you have to have a license to purchase anything) but the lady that was the manager let us come over and get things under the table. Believe me, on my newly single mother income there is no way I could have afforded it otherwise. Of course back then I didn't know the gift that I was being given in that opportunity, otherwise I'm sure I would have eaten a lot more ramen noodles and bought a LOT more polish believe you me!
My love for this polish wouldn't let me throw it out when it began to thicken to the point where one nail application caused long strings of polish or when it started to seem more like I was applying a thick gooey putty to my nails. Regular nail polish thinner worked for maybe one application but then it was back to goop. Even when it didn't get closed properly and leaked enough polish to seal the lid on I just couldn't bring myself to get rid of it. Instead I would sit and admire the fluctuations of color in the bottle before heaving a mighty sigh and putting it back.
Saturday I made my first trip ever to Ulta beauty store (A veerry dangerous place that!) and picked up a bottle of Seche Restore Thinner. I kept putting drops in the lid and sitting it upside down to soften the spill that sealed it in the first place. As is, it took over an hour for it to soften the polish in the lid enough for me to get it off. After that it was a good clean up with some acetone then the addition of more Seche Restore to the polish it's self. I am a believer, a follower, whatever! This is one product that will forever be in my nail arsenal.
In addition to my Amethyst Abyss the Seche Restore has saved five other bottles of thick, goopy, stringy polishes that would have otherwise sat in exile to be admired in the bottle only. Many thanks to Scrangie and her excellent post!!

Saturday, July 17, 2010

My military nail fail

When worn, nail polish will be conservative, a single color or a French manicure that is natural or clear with white tips, and in good taste. The polish will not contain any ornamentation.

That is a summary of how your nails should look when you're in uniform...

Yeah, I think I failed on that one. I was surprised though, I went to renew my registration on the jeep and was complimented on them.

Edited to add that my base color was OPI's Burmese Blush, the stripes were done with Stripe Rite white and gold (not the glitter).

Wednesday, July 14, 2010

Ho Hum nails

I get to do a few days here and there in uniform for the Air Force. Last week it was Thursday thru Sunday and this week it's Thursday and Friday.
Thing is, in uniform they're very specific on what you can or rather can't do with your nails. (The can't do list is much longer than the can do.)
While I was on active duty for three years I either had an acrylic french or my natural nails unpainted but rebelled in my own way by having bright toes. Now that I've been off orders for a long while I've gotten used to having my flashy fingers.
Last week I had the most muted, pale pink nails I've had in a long while and they nearly put me to sleep every time I looked at them.
I've been looking at my collection of polishes, the blues and purples, the deep, bold reds, the vibrant greens and cheery yellows and oranges and wondering what to do. Do I add some flash to a basic pink and hope I can get away with it or do I just suck it up and keep it boring. It's only two days.
In other news, our Walgreens is having a sale on Sally's Xtreme wear, two for $4. The daughter and I picked up some fun colors. I think they'll be way fun for water marbling.

Sunday, July 11, 2010

Quick change

I rocked my patriotic pedi through the holiday but wanted to get a new look with my toes without doing a complete polish change. The solution, just change polish on my big toe and add a few details. Voilà, from this

4th Toes

To this

Photobucket

A simple yet classy new look and all I did was red french on the big toe, add a little flare and a flower then dot the tips of my smaller toes. It took less then 10 minutes.

Wednesday, July 7, 2010

Wild Stripes Tutorial

I'd like to give credit where it's due but alas I can't recall where I saw the inspiration for this look. It was just too fun to not give it a try. Once my nails get a bit longer (since you need a bit of room to get all the colors in.) I'm going to give it a whirl on my own.


Step 1: Take your yellow polish (China Glaze 'Solar Power') and with a sponge apply it on either side of the horizontal center of your nail leaving a blank space in the center.


Step 2: Take your blue (China Glaze 'Shower Together') and with the sponge apply it to the center and extend out about midway into the yellow.


Step 3: I wanted to pump up the brightness on the green that was created by overlapping the blue and yellow so I took some Pure Ice 'Wild Thing' and sponged that over the top.


Step 4: From there I took orange (Sinful Colors 'Patrika') and sponged it out to the tip.


Step 5: Being careful not to cover all of the orange take some gold (Orly 'Glitz') and sponge to the tip.


Step 6: For the final bit of color take some brown (China Glaze 'Unplugged') and sponge just the very ends of the nails.

The base color is now done. Pretty cool huh? It looks a little rough but your top coat will take care of that.


Step 7: Now, with an unsteady hand (Yes you read right, it looks better if your a bit shaky.) start to draw in your lines. I used Stripe Rite black but I've used a black sharpie before and it works ok. Keep the lines irregular in shape and length. I alternated sides.

When you're done it will look something like this. Nice eh?


And finally, add your topcoat (Orly) ***Note: I had a bit of an issue with the stripes smearing vertically at the tips and making it look all wonky when I applied the top coat as you normally would from the nail base to tip. To keep this from happening apply the first coat horizontally with the stripes, that way if it smears it doesn't matter.
This picture is showing one coat so you can see how it's smoothed things out and brightened them up. I'd recommend a second coat though since you can still see a bit of the roughness from the sponge technique.

When Hobbies Collide

I have learned that polymer clay and nail polish do not mix. First you get a nasty film over the surface of your nail and when you go to wipe it off (which takes considerable effort) it takes your polish off with it. Not a pretty sight at all.
Oh well, c'est la vie. It's for the best. I have to wear a uniform for the next few days and I'm sure they would have frowned on my periwinkle nails. So on the bright side. Polish change!

Monday, July 5, 2010

I'm feeling Periwinkle

I have a new favorite polish. China Glaze 'Secret Peri-Wink-Le' . Reason being it's a perfect shade of periwinkle (it looks more blue in the pic than it is) and also because periwinkle is one of my favorite words.

So I did my nails, one coat base coat and two coats polish (probably could have gone with a third but I felt I was pressing my luck with two since I'm super prone to smearage).


Thursday, July 1, 2010

Red White and Blue Cont.

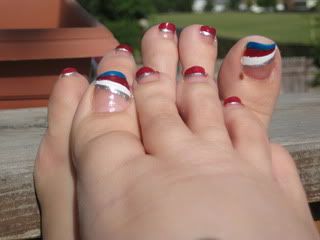
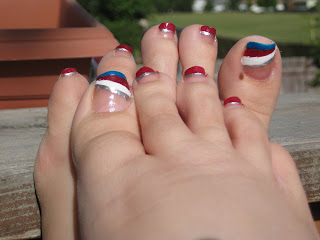
I decided to take my red white and blue theme down to my toes too. I decided to use different shades than what I used on my fingers though.

Used: Savvy 'Blush' for a base coat (it's a lovely clear red that does wonders for a bare nail), China Glaze 'Blue Sparrow (neon)', Orly 'Glam', and Stripe Rite 'White' & 'Silver'.