Pages

Monday, March 26, 2012

Half A$$ Half Moon

Ok so it wasn't really half a$$ed, I did try to make it look good, and I got a couple of complements on them, but I think I bit off a bit more than I could chew with this one, which sounds silly since half moon mani's don't seem all that difficult.  I did say seem, there are several things that I did wrong to make things not look as good, but, I post the bad as well as the good so I can track my improvement. It's all a learning experience right?
Painting my nails with Wet n' Wild white first, I used page reinforcements as my guides for masking out the half moon shape.  It doesn't seem that it should be that difficult, but as you can plainly see, even when I thought I had things lined up and even...I didn't.  It could have been worse, but it was just off enough to make it look wonky to me.
Once I had my half moons masked out, I took Nicole by OPI in OMB! and applied about three coats for it to completely cover the white.  If I'd stopped there I may have been ok, but I wanted to bit more depth to the color so I grabbed Kleancolor Chunky Holo Scarlet and topped the red with just a single layer of it.  This made things significantly more goopy than I think could work, so even after waiting for the polish to set, I got jagged edges.  To top things off, the existing polish and Seche didn't work well together and applying my top coat to try and smooth things out dragged pink into my white. 
So I need to work on this technique a bit.  I think next time I'll work on the masking placement and go for fewer layers because I think that's what caused quite most of my issues. 

So do you have a simple look that has defeated you, care to share? We can commiserate together. Thanks so much for stopping by and reading, I really appreciate it.  Until next time, take care!

Tuesday, March 20, 2012

Fun and Flirty

Short post today.  I wanted to add a little something to my nails, I'm still wearing OPI's I Have a Herring Problem.  For a little bit of extra glitz I added two coats of Wet N' Wild Blue Wants to be a Millionaire, a blue based holographic shimmer.
I used OPI Road House Blues and China Glaze Electric Beat to do some basic stamping,  I haven't stamped in forever but I found an "As Seen On TV" set for $10 and couldn't pass it up.  It included a handful of plates, a double sided stamper, a stabilizer platform and a scraper, all in all, a pretty good deal. I got mine at a fabric store of all places, but I've since seen them at Sally's
I really like how using the two tones came out looking.  If I didn't have to work I might have put some little jewels in the center of the flowers but oh well. 
Of course everything is finished off with a coat of Sech Vite.  A new bottle.  I love new bottles of Sech!

Here are the products I used,  I hope you enjoy this look.  Until next time, take care!

Sunday, March 18, 2012

Going Dutch with the Holland Collection

My opinion is that OPI hit a home run with the Holland collection.  I may be a bit bias though, my sister in law is from Holland and she and her family are all just wonderful.  Her brother and I were pen pals for the longest time when I was younger and to this day I hope that one day I'll get to see their beautiful country full of windmills, tulips and wooden shoes.
This color is I Have a Herring Problem. What's funny is that I once had a guy who's last name was Herring who's needy and contradictory behavior caused some problems, so this name made me laugh.  Unlike that guy, this color is a total winner. 
This beautiful greyed out blue with a subtle punch of iridescent shimmer is amazing, the formula is perfect and is almost a one coat wonder.  If you're in a hurry you could easily get away with just one smooth coat, but here I've used two just to keep things even.  Close up pictures you know.  Some of these look as if there were a visible nail line for some reason, but it was not at all apparent in real life.
Application was super easy.  It flowed smoothly from brush to nail and I hardly had any cleanup to worry about.  
I think I've mentioned that I prefer the blues from the spring collections this year and this color is probably my favorite.  Between the very flattering shade, the  ease of application and that little bit of shimmer (love that shimmer!) this is just a win, win in my book. 
Have  you tried any of the polishes from the Holland collection, what about this one and what did you think?  

Thanks for stopping by, 

Monday, March 12, 2012

Dazzled up Pink

This isn't my most favorite look, but it was pretty for all of the one day that it lasted, after that, I was tired of it and it came off.
 I used Orly Artificial Sweetener, Trans Design Mystic Haze nail foil, Orly Twilight, China Glaze Techno.
I used two coats of Artificial Sweetener, it was rather sheer and left a visible nail line, but I was too lazy to add a third coat.  This is from Orly's Cool Romance collection and it's a pretty dusty rose with a very subtle shimmer. 

From there, I used Robin Moses' technique for foils (I've been really into foils since watching her video) where you paint the tips with the adhesive then "tap" the foil on. Then, rather than use glitter to fill in the gaps, I used China Glaze Techno to add some extra bling to the area.

A coat of Orly Mystic Haze then went over the remaining nails followed by Seche Vite over the whole lot of them.  Unfortunately, the top coats caused the holo effect of the Mystic Haze to warp so it looks more like a plain silver foil but I like the look none the less.   I didn't balance them correctly,  I was going for an accent tip then an accent nail  but it didn't quite come out right.  Ah well, live and learn right?

Thanks so much to you all for stopping by, I appreciate you taking the time to read and comment  Until next time, take care.

Saturday, March 10, 2012

Royal Candy Coating.

Have you read One Gent's Ten?  It's quite interesting having a mans input into the world of nail polish.  His swatches are well done and tidy and his nails neat and masculine (polished or not, I prefer shorter nails on a man.)
One of the things that I really like is how his view point is making me take a new look at polish and finishes as well as looks that are attainable to individuals with shorter nails.  He recently did a post on candy paint jobs for vehicles  Chances are you've seen them, these are the paint jobs that always make you look twice and wonder if you have a polish that color.  Come on, I know we've all done it.  He accomplished his look via a jelly sandwich, a layering technique involving a jelly polish and glitter polish. 
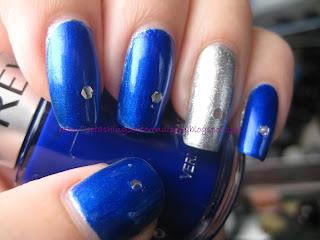
I wanted to achieve something more true to the actual finish I've seen on vehicles, so here you see the original color that I started out with on my ring finger.  This is China Glaze ***  a beautiful silver shimmer that applied beautifully.  This is two coats, and they dried fairly fast.  Over the top of that I used a single coat of Revlon Royal, a blue jelly that in this instance I wanted to be a bit more sheer.  You have to enlarge the photos to see, but there is a definite depth that is very striking, a certain something that adds an additional element of elegance.  To finish I used a single holo hex from a glitter mix and added it to the center of the nail.  A tiny flake of other glitter snuck in on my middle finger, but I am calling it a design element now.  :) 

While this is very much the right direction that I want to go, this isn't quite the look I was hoping to end up with, honestly I wanted a bit more...something.  The tip wear wasn't impressive either, the Royal wore down in about half a day.  So I'll be trying this look again.  Meanwhile, I hope you enjoyed this look.  Many thanks to Scott for his inspiration.

Thanks so much for stopping by and reading and commenting.  Until next time, you all take care!

Thursday, March 8, 2012

Technologically Speaking

I am going to admit that I borrowed this look from someone, problem is, I thought I knew who, but when I went back to link, turns out I thought wrong.  So if this is your look that I borrowed, or if you know who, let me know and I will more than happily give credit where credit is due.  :) 
Her look is more precise than mind, Precise is not my middle name, it's...well, we know what it's not.  To make this look I started off by applying 2 coats of China Glaze Electric Beat over all of the nails.  This is a very pretty blue from the Electropop Collection.   I'm preferring the blues and purples from most of the spring collections this year, the pinks are rather plain, and the greens are ho-hum.  This blue reminds me of a spring sky, fresh and clean looking without a trace of gray or muddiness.
 
I then took OPI Dutch Ya Just Love OPI and applied it to half the nail of my ring finger, then using a black striping polish I applied it to about a quarter of the outer edges of the nails,  I used  the same polish to draw in the geometric pattern.
I let that dry a bit before trying anything else. 
I then applied the yellow dots using a yellow striper polish (because it's a lot more opaque than regular polish) with a dotting tool down the center and sites. 
I like how it turned out.  How about you? 

Thanks so much for stopping by and reading.  Until next time, take care!

Friday, March 2, 2012

Ombre nails

According to Merriam Webster Dictionary, ombré means having colors or tones that shade into each other

Looking at the nails from fashion week it would appear that ombré is the new "in" term for gradient. The key being to have the transition to different shades of the same color happen seamlessly. Easier said than done for us mere mortals but I really like it, so thought I'd give it a go.
Products used:  China Glaze Sunshine Pop, OPI Did It On 'Em, China Glaze Gaga for Green, OPI Green-wich Village, Art Glitter & Gonfetti in lime green.  Not shown, OPI Fresh From of Bel-ar

While most of the ombré nails I saw were done with earth tones, I wanted something a bit brighter, more spring like, so I chose to fade from green to yellow.  I'd recently purchased China Glaze Sunshine Pop and thought thought it would be a perfect starting point. I covered all of my nails in it and let it dry almost completely.  As far as yellows go, it's fairly nice, the texture is quite creamy and fairly opaque for a yellow, it did have a tendency to drag though and took three coats to get an even coverage.  What I didn't like at all was the massive bubbling that took place.
Pretty, but I don't like the "shelf" that the glitter caused and it needs a bit more something.
I tried a couple of different sponging methods to achieve the ombré effect. The ring finger and thumb I used a piece of a natural bath sponge and worked from the yellow down to the green.  I also found that I could get a better blended look if I dipped the sponge in the tiniest amount of polish thinner
Now I'm happy
For the index finger I used a standard makeup sponge and worked from dark to light.  I think I like the way it turned out better but I did have to retouch the yellow because it was easy to extend the green too far up on the nail.  I then used a slower drying top coat to help blend everything together.  Once that was mostly dry I used some foil glue and applied it to the center of the nails and added glitter.  Because the surface of my index finger was a bit more tacky than I thought it ended up adhering to most of the nail rather than just the center section...I ended up liking it better that way but oh well.
I wanted just a bit more contrast towards the tips, so I grabbed my OPI Fresh Frog of Bel-air and being careful not to get too many of the silver hexes, I applied it to the tips and pulled it just slightly up onto the middle of the nail.
From there it was just a matter of a couple of coats of Sech Vite to even everything out and done, ombré nails fit for fashion week. 

So did you have any favorite looks from fashion week?

Thanks so much for taking the time to read and comment, until next time, take care!