Pages

Friday, July 30, 2010

Fun Edges Tutorial

So here's a fun addition that I made to my News of the Beloved Mani. I got the bright idea that you could use decorative scissors to create something similar to the french tip guides. I remember seeing someone using a similar idea with painters tape (sorry, can't remember where) but figured I'd share my version.

Lets pull together our supplies.
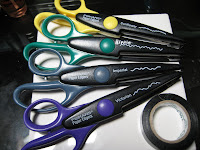
First you'll need some cool craft scissors. Being a bit of a jack of all crafts I have a multitude of decorative edge scissors as you can see. These are just some of the ones that have potential for my purpose.
I use electrical tape because it seems to be pretty close to the material they use for the nail guides. It has great adhesion and won't tear. The narrowness of the tape makes it a bit more difficult to work with so find the widest you can.
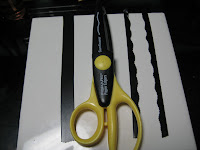
Here you can see I've taken a length of electrical tape and cut it down the center. You then have for lack of a better term a negative and a positive pattern. From here you can cut them into shorter lengths for your individual nails.
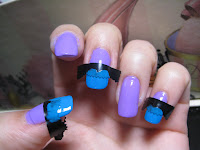
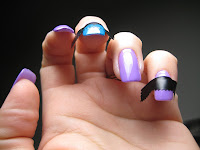

Then, just like with the nail guides, place them on your nail (which should already have a nice dry base color) and with the polish of your choice (I used Sally Hansen Xtreme 'Blue Me Away') paint from the guide out (notice how my brush strokes start in the middle of the guide) filling in any missed spots as needed. Be careful to not to use too much polish, if you do it makes it harder to achieve a nice detail. If you do accidentally use too much polish, take a cotton swap dipped in polish remover and clean as close to the edge of the guide as possible, this cuts the goopyness and hopefully allows for better detail.
Wait until the polish is almost but not quite dry and pull the guide TOWARDS you slowly. To clarify, on my nails I pulled it back towards my arm not toward the tips of my nails even though they were pointed towards me for this picture. Make sense??
From there, it's just a matter of applying your top coat and enjoying your new look.

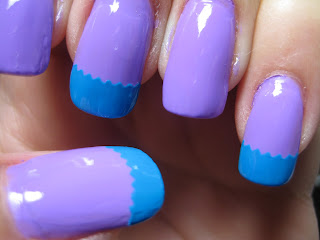
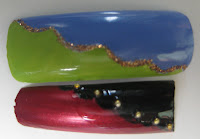
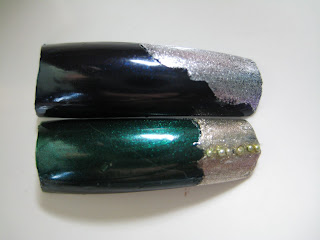
Here are some pictures of other edges I've used (pardon the glitches...the things you don't notice until you take a closeup.). Play around with it and have fun. I hope you enjoyed this little tutorial. If you try it out I'd love to see it!
Thursday, July 29, 2010

QRS News of the Beloved


This is QRS's News of the Beloved.
I'm trying to figure out how the name ties in with the color which is a lovely bright lavender. My camera makes it seem a bit more blue than it is, but I don't know enough about it to fix that so you'll just have to trust me.
Coverage is ok in two coats but I'd recommend a third because the application is a little streaky. Also, it's a semi-matte that dries really fast so visible brush strokes are an issue. For the most part though a clear top coat will fix both of those issues.

I'm not a huge fan of the pastel-y colors but I am kinda in love with this one, it's super flattering to my skin tone and makes my barely there tan look like I live in California rather than vacationed there. I love finding colors that really work for me and my top two are this color and OPI's I'm Not Really A Waitress.

Do you have polishes that just work for you and enhance your skin tone?

Wednesday, July 28, 2010

Accent colors

Polish Hoarder always has these wonderful challenges where she supplies the theme and you supply the creativity. I love seeing what people come up. Last week she had a Color Accent challenge where you could only use black, white and grays and one pop of color. I couldn't participate since we were getting ready to go and actually on vacation, but it interested me enough that I really wanted to give it a whirl.
If you want to see a video tutorial for plaid nails, I pretty much stole this from Nails by Asami. I just thought the look would be perfect.


Now that I've done plaid nails I can say that I like them. How about you, have you tried them?

Whoops, forgot to mention what color I used (thanks peripatetic33). American Apparel Factory Grey is my base, the white and black stripes are Stripe Rite and I actually started using the bright green Stripe Rite for the green but it didn't pop enough so I went over it with Finger Paints Guggen I'm Lime (love that name).

Tuesday, July 27, 2010

American Apparel 'Factory Grey'

Here is one of the polishes that I picked up while on vacation in California and probably my favorite.
American Apparel Nail Lacquer in Factory Grey is a wonderful gray creme with maaaybe just the barest hint of pink.
The consistency is perfect, not too thick, not too thin so application is a dream. You get perfect coverage in two easy coats and it dries with an almost vinyl shine. Gorgeous! It's a perfect gray for wearing alone or (teaser) using as a base for some pretty nail art. It really allows an accent color to pop.
My only complaint is the bottle, since it's so narrow I was in constant fear that I'd tip it over.


Yesterday as I was swatching all my polish on nail wheels I discovered that I am sadly lacking in gray polish. I only have two that could be considered true grays. I actually find that kind of sad and have every intention of rectifying the situation.
How about you, where do you stand with gray polish?

Monday, July 26, 2010

She's back!

We've returned from California, pulling into the driveway at about five o'clock Monday morning. I promptly fell into bed for the next six hours (nothing makes you appreciate your own bed more than not sleeping in it for a few nights).
I was hoping to get a bunch of swatching done in the afternoon, but while I was getting the first color on the sun disappeared behind a thick layer of clouds and refused to make another appearance for the day.
I did get pictures of the polish I picked up in California. I was rather surprised to find these actually, the Boardwalk of Venice Beach doesn't really sound like someplace where you can get nail polish, but you can and I'm glad.

American Apparel Nail Lacquer in Manila, Factory Grey and Pinto. Then Manic Panic in After Midnight and Unicorn.

I will get to Show n' Tell just as soon as the sun comes out.

Friday, July 23, 2010

Quirius

Greetings from California!! After a 15 hour drive we arrived to gray skies. I thought it was smog but I'm happy to report it's just a cloud cover that rolls in off the ocean during the night. It usually burns off by about 1:00. And yes, I am sunburned. Other than that, It's beautiful. We're staying about three blocks away from Venice Beach. Today we did nothing more than shop on the Boardwalk.
I've been on the lookout for new polishes and I've found some from Manic Panic and American Apparel. I'll show them off once I'm home since I didn't bring the stuff to do a polish change here. (My Artistic Azure is a bit dull with a tiny bit of tip wear, but still going strong!)
Anywho, on with the main topic of this post which I wrote up before I left home...

LunatiKitty has recently had several posts involving Quirus nail polishes.
Since I'm pretty new to this nail stuff I wasn't surprised when I hadn't ever heard of them, so I went polish hunting and discovered Q.R.S. Beauty.
Honestly, I was expecting high priced polish, imagine my surprise and delight to see that they were amazingly affordable. $3. for a single .5 Fl Oz. bottle and $15 for a set of 6. Shipping was exceptionally reasonable and gloriously quick as well.
I'll give a full mani run down of each color in later entries but as of this moment I've single nail tested a few of the colors and find the formula smooth and easy to work with. The finishes vary from gloss to a semi matte that is just fun (they don't really tell you though so it's a toss up) and for the most part, coverage is excellent in two coats.
All in all I've been absolutely delighted with my order and have every intention of purchasing from them again...soon. :)


Here is what I got:
Photo on the right, Quirius Set 03 Blossom which includes (from left to right) Nubba Dubba, Ok is Me, Chastity, Violet Pink, Royal Love, Lavender Bouquet.

Photo on the left, Caribbean Turquoise (this is one yummy blue), News of the Beloved (My free gift), Royal Glitter, Russian Red, Decades of Shades and Red Square (this color is a wonderful surprise, more on it later).


Please keep in mind that I purchased these polishes, I was not given them nor paid to endorse them (I wish). So this is my honest, unpaid opinion of the company and these polishes. I'm sure that should you choose to visit their store you will encounter the same experience

Wednesday, July 21, 2010

The Cali Mani

So, I can't tell you how much I agonized over this mani. Not because it's all that, but because it's for my trip to L.A. and has to be simple yet awesome and last until Sunday.
Well I think I managed the simple yet awesome part, but we'll have to wait and see on the lasting until Sunday part. My last few mani's I've tried Orly Bonder for my base coat with fairly good success. I say fairly good because I am beyond wicked to my nails. Cruel and unusual treatment comes to mind and that is why all of them now have a nice thick layer of acrylic over them. If I didn't I would have nothing but sad little nubbs...but back to 'Bonder'.
As said it seems to really be helping the staying power of my polish, I just don't have a long enough attention span to let a polish go long enough to see how far it will take me. At the moment I think four days is my record and I came out with barely there tip wear and part of that was because I did a pedi and held the cotton ball with my finger tips... Someday I'll learn right?

So back on track, this polish is Finger Paints Artistic Azure which I'm sure you can see is a gorgeous blue. It reminds me of the ocean and the sky so I figured it would be perfect for Cali.
The first coat went on a little streaky but the second coat fixed that and because I can't leave well enough alone, a third coat went on topped by Sally Hansen's quick dry (in the red bottle which isn't in front of me at the moment to see what it's actual name is).
It was lovely but I wanted to bump it up just a wee bit more, so I took Stripe Rite's blue glitter and added the diagonal streak. I need to put the top coat over that (these pictures are sans top coat over glitter) to beef up the shine a bit but other than that I'm really please with how this mani turned out.
What do you think, is it suitable for Cali?

.